
how to stitch
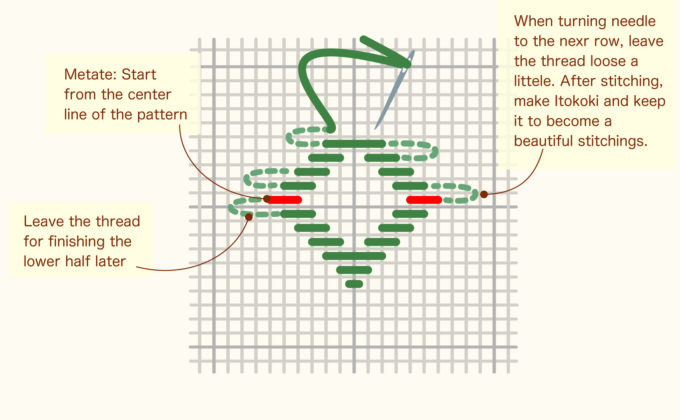
In both kogin-zashi and hishi-zashi, the needle is threaded between the warp and weft threads of the cloth. The basic mothief (modoco and kataco) have many patterns that are the symetory on the top, bottom, left, and right sides, so the first step is to complete the exact number of stitches in the center row (first row), then finish either the top or bottom half, and then finish the other half in the same way as the first half. The first stitch in the first row is called the “metate,” and stitches are piled up based on this first row, so if the number of stitches in the first row is wrong, the entire pattern will be out of place. The larger the pattern, the more care is needed.

In the diagram above, the squares represent the warp and weft threads of the cloth, and the intersections of the ruled lines are the cloth grain (gaps). Since it is important to count the warp threads, in the diagram, every 10 threads are grayed out from the center warp thread. The red row are called “metate”.
Mekazu is the number of times the needle crosses over the warp threads of the cloth. Kogin stitch uses an odd number of stitches to create a pattern. The three main types are 1, 3, and 5 stitches.

Straddle one warp thread of the cloth = 1 stitch

Straddle three warp thread of the cloth = 3 stitch

Straddle five warp thread of the cloth = 5 stitch
The next pattern is a little closer to the cloth.
There are two types of kogin stitch patterns: one is the above type in which squares represent warp and weft threads of the cloth, and the other is a method in which ruled lines are regarded as warp and weft threads of the cloth, as shown below. (The patterns used in this site are based on the above type, in which the squares are used to count the threads).

When the horizontal row of the pattern is completed, shift one step. Bring the needle out from the one-step shifted position on the reverse side and advance the needle in the opposite direction of the previous step. When folding back, leave the thread loose on the reverse side. When you have finished that step, Threading to blend the stitching thread into the fabric. If there is no looseness in the fold over at this time, the fabric may tangle.

Actual state of the pattern on the cloth